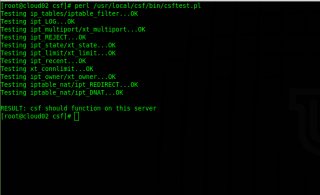
CentOS 7にCSF(ConfigServer Security&Firewall)をインストールして構成する方法

ConfigServer Security&Firewall(略してcsfとも呼ばれます)は、ステートフルパケットインスペクション(SPI)ファイアウォールです。CentOS7へのCSFのインストールと構成について学ぶ

このチュートリアルでは、Ubuntu20.04にFiveMサーバーをインストールする方法を説明します。
前提条件
1.サーバーを最新の状態に保ちます
セキュリティ更新のために、サーバーを常に最新の状態に保ちます。
# apt update -y
# apt- upgrade -y
2.UFWにポートを追加します
FiveMが正しく機能するために必要なため、次のポートを必ず開いてください。
# ufw allow 30120
# ufw allow 30110
3.FiveMをインストールします
まず、空のディレクトリを作成して移動します。このディレクトリには、すべてのFiveMサーバーファイルが保持されます。
# mkdir ~/fivem_server
# cd ~/fivem_server
次のコマンドを使用して、最新のマスターブランチをダウンロードします。
# wget https://runtime.fivem.net/artifacts/fivem/build_proot_linux/master/3074-0c5d71ad77873c159d7542a7e8314d9696c1b55b/fx.tar.xz
最新のマスターブランチビルドについては、アーティファクトサーバーにアクセスしてください。wgetコマンドでダウンロードしてください。
ダウンロード後、次のコマンドを使用して解凍します。
# tar -xvf fx.tar.xz
これにより、必要なすべてのファイルが抽出されます。
ダウンロードしたアーカイブを正常に抽出したら、削除できます。
# rm fx.tar.xz
次に、cfx-server-dataリポジトリをサーバーファイルフォルダー外の新しいディレクトリに複製します。このディレクトリには、サーバーリソースが含まれます。以下のコマンドは、リポジトリを ホームディレクトリのfivem_resourcesという新しいフォルダに 複製します。
次に、FiveMライセンスキーで無料ライセンスを生成します。
私たちは、の名前で1つのコンフィギュレーション・ファイルが作成されますSERVER.CFGにfivem_resourcesのディレクトリを。
# vi ~/fivem_resources/server.cfg
次の行を追加します。
# Only change the IP if you’re using a server with multiple network interfaces, otherwise change the port only.
endpoint_add_tcp "0.0.0.0:30120'
endpoint_add_udp "0.0.0.0:30120'# These resources will start by default.
ensure mapmanager
ensure chat
ensure spawnmanager
ensure sessionmanager
ensure fivem
ensure hardcap
ensure rconlog
ensure scoreboard# This allows players to use scripthook-based plugins such as the legacy Lambda Menu.
# Set this to 1 to allow scripthook. Do note that this does _not_ guarantee players won’t be able to use external plugins.
sv_scriptHookAllowed 0# Uncomment this and set a password to enable RCON. Make sure to change the password - it should look like rcon_password "YOURPASSWORD'
#rcon_password "'# A comma-separated list of tags for your server.
# For example:
# - sets tags "drifting, cars, racing'
# Or:
# - sets tags "roleplay, military, tanks'
sets tags "default'# Set an optional server info and connecting banner image url.
# Size doesn’t matter, any banner sized image will be fine.
#sets banner_detail "https://url.to/image.png'
#sets banner_connecting "https://url.to/image.png'# Set your server’s hostname
sv_hostname "FXServer, but unconfigured'# Nested configs!
#exec server_internal.cfg# Loading a server icon (96×96 PNG file)
#load_server_icon myLogo.png# convars which can be used in scripts
set temp_convar "hey world!'# Uncomment this line if you do not want your server to be listed in the server browser.
# Do not edit it if you *do* want your server listed.
#sv_master1 "'# Add system admins
add_ace group.admin command allow # allow all commands
add_ace group.admin command.quit deny # but don’t allow quit
add_principal identifier.steam:110000100000000 group.admin # add the admin to the group# Hide player endpoints in external log output.
sv_endpointprivacy true# Server player slot limit (must be between 1 and 32, unless using OneSync)
sv_maxclients 32# License key for your server (https://keymaster.fivem.net)
sv_licenseKey replaceThisWithYourLicenseKey
注:このreplaceThisWithYourLicenseKeyを生成されたライセンスキーと再レースします。必要に応じて、いくつかの設定を変更することもできます。
完了したら、保存して終了します。
4.サーバーを起動します
サーバーを起動するには、サーバーリソースディレクトリにいる必要があります。次に 、fivem_server ディレクトリのrunserver.shスクリプト を使用してサーバーを起動できます 。+ execserver.cfg パラメーターを必ず含めて ください。
# cd ~/fivem_resources && bash ~/fivem_server/run.sh +exec server.cfg
オプション:サーバーをバックグラウンドで実行します
サーバーをバックグラウンドで実行するには、screensessionを使用します。
# cd ~/fivem_resources && screen -s "FiveM server' bash ~/fivem_server/run.sh +exec server.cfg
FiveMコンソールを終了する場合は、 CTRL + Aを押してから、Dを押します。コマンドscreen-rを使用して、ウィンドウを再度開くことができ ます。
一般的な問題
FiveMサーバーが正常にインストールされました。
このチュートリアルでは、Ubuntu20.04にFiveMサーバーをインストールする方法を見てきました。
ConfigServer Security&Firewall(略してcsfとも呼ばれます)は、ステートフルパケットインスペクション(SPI)ファイアウォールです。CentOS7へのCSFのインストールと構成について学ぶ
CentOSにR1SoftBackupAgentをインストールして構成する方法を学びます。R1Soft Server Backup Managerは、サービスプロバイダーに柔軟でサーバーフレンドリーなソリューションを提供します。
この記事では、CloudLinuxLVE制限を変更する方法について説明しました。それでは、始めましょう。CloudLinux LVE制限は、LVEマネージャーを使用して変更できます。
LinuxサーバーのSSHポートを変更するには、SSH経由でサーバーにログインし、SSH構成ファイルを変更する必要があります。
Centova Castは、インターネットラジオストリームの主要な管理プラットフォームであり、ストリームホスティングプロバイダーに広範な洞察と制御を提供します。CentovaCast
次の電子メールリレー設定を使用すると、電子メール送信の問題を解決できます。
Ubuntu18.04サーバーにApacheMariaDBPHPとPHPMyAdminをインストールする方法を学習します。Apache、MySQL / MariaDB、およびPHPはパッケージで構成されています。それはランプとして知られています
Linuxでユーザーを追加、変更、または削除しますか?これがあなたにぴったりの記事です。
Linuxでのグループ管理の詳細をご覧ください。Linuxでグループを追加、グループを変更、グループを削除、メンバーを追加する方法。新しいグループを作成し、groupaddコマンドを使用します。
Fail2banは、SSH接続を保護するのに非常に役立ちます。これで、centos7にfail2banをインストールして構成し、サーバーにセキュリティのレイヤーを追加できるようになります。

